How to Take Professional Before-and-After Photos in Your Clinic

Introduction
You sit down with a patient to review their progress. The "before" image was snapped quickly in a hallway, the "after" in a treatment room near a window. Different background, different distance, different light. The result you worked hard to deliver is buried under photography noise.
Every clinic has its version of this story. Across dermatology, aesthetics, plastic surgery, wound care, and orthopaedics, the problem is the same: the patient has changed, but the photos don't show it, or worse, they make things look better or worse than reality. Medspas running injectables, body contouring, and laser under one roof need a single workflow to document every aesthetic treatment — not separate camera rolls per treatment type. Studies in clinical and cosmetic photography (American Society of Plastic Surgeons positioning standards, Journal of the American Academy of Dermatology) have repeatedly shown that inconsistent positioning, lighting, and camera settings can create the illusion of change where none exists, or hide real clinical improvement.
The good news: you do not need a studio or a DSLR to fix this. You need a simple, repeatable setup and a workflow that keeps the variables under control. This guide is a practical playbook for clinicians and medspa teams who want their before-and-after photos to look professional and actually tell the clinical truth, using the smartphone you already have.
What makes a before-and-after photo "professional"?
A professional before-and-after photo is one where the only thing that changes between the two images is the patient. Every other variable, lighting, background, distance, lens, angle, expression, patient preparation, is held constant so a clinician (and the patient) can see exactly what the treatment did. "Professional" is not about expensive cameras. It is about reproducibility.
That definition matters because it sets the bar. If a viewer cannot tell whether the change is the result of treatment, lighting, or pose, the photo has failed clinically, no matter how flattering it looks.
The principle: consistency beats camera specs
When you look at before-and-after galleries that feel trustworthy, they all share the same underlying pattern: identical framing, identical lighting, identical background, and the only thing that changes is the patient. The cameras might range from high-end DSLRs to iPhones, but the variables that matter are tightly controlled.
Clinical and aesthetic photography guidelines converge on four rules:
- Use the same lighting for every set.
- Keep distance and angle the same.
- Use a neutral, unchanging background.
- Capture matching expressions and poses.
Once those are in place, the difference between a flagship smartphone and a dedicated camera is marginal compared with the difference between "random hallway selfie" and "repeatable clinical setup." For the deeper positioning theory (Frankfort plane, clock method, dual-source lighting), see our companion post on medical photography best practices.
Smartphone vs DSLR for clinical photos
A common question is whether a smartphone is "good enough" for clinical work. For most non-research clinics, the answer is yes, provided you use it consistently.
| Factor | Modern smartphone (iPhone 14+, Pixel 7+) | DSLR / mirrorless |
|---|---|---|
| Image quality at clinic distances | Excellent | Excellent |
| Wide-angle distortion at faces | Real risk on the 1x lens; use 2x / portrait | Easy to avoid with 50–85mm |
| Setup friction | Low (already in your pocket) | Higher (case, charging, settings) |
| Workflow integration | Direct capture into clinical apps | Card transfer or tethering |
| Cost | None (already owned) | €700–€2,500+ |
| Standardisation lever | Reproducible setup | Reproducible setup |
| Best for | Day-to-day clinical and aesthetic work | High-volume aesthetic studios, research |
Bottom line: if you are asking "should I buy a DSLR before I start documenting properly?", the answer is no. A smartphone with a fixed lens, fixed distance, fixed lighting, and a clinical app produces professional, comparable photos. Camera bodies do not.
Step 1: Choose one dedicated photo spot
Professional before-and-after photos start with where you take them, not what you take them with.
Pick a permanent location
Choose a single place in your clinic where you will take all clinical photos: one wall in an exam room, a corner of your procedure room, or a small photo alcove.
What you want from this space:
- You can control the lighting (you can turn off or block windows if needed).
- You have at least 1 to 1.5 metres of distance from the patient for face photos.
- You can place a neutral background behind the patient.
Trying to "chase good light" around the clinic produces photos that never match each other. A slightly imperfect but consistent spot is better than the "best-looking" spot that changes every day.
Use a neutral, non-distracting background
Busy backgrounds (posters, equipment, storage shelves, patterned wallpaper) pull the eye away from the treatment area and make comparisons harder.
Aim for:
- A plain, mid-tone background. Light grey, light blue, or beige work well for skin.
- No visible text, logos, or patterns.
- The same background for before and after. Even small colour changes can shift the perceived skin tone.
You can achieve this with a painted section of wall, a roll-down paper or vinyl backdrop, or a collapsible background you set up behind the patient. The background's only job is to disappear and stay the same.
Mark the floor
To keep distance and framing consistent, mark the floor:
- One strip of tape where the patient's heels go.
- One strip where the camera or tripod sits.
This low-tech detail removes most of the drift in distance that makes faces look bigger in one visit and smaller in another.
Step 2: Use lighting that flatters and matches
Lighting is one of the main reasons "after" photos look nothing like "before", or look better only because the light is nicer.
Avoid mixed and changing light
The worst-case scenario for comparison is mixed lighting:
- Ceiling fluorescent + daylight from a window + a warm desk lamp.
- Morning photos in soft daylight, afternoon photos in harsh overhead light.
Under these conditions, skin tone and texture will change dramatically from visit to visit, even if the patient's skin has not changed at all.
Instead:
- Turn off or block windows if you cannot control them.
- Turn off decorative lamps during photo capture.
- Rely on a small number of known, repeatable light sources.
Aim for soft, even, "daylight" colour
For clinical and aesthetic work, guidelines recommend neutral "daylight" white light, around 5000 to 5500K, which keeps skin tones consistent across sessions.
Practical setup with minimal gear:
- Two identical LED panels or lamp heads, placed at roughly 45° angles to the patient, one on each side, at or slightly above face height.
- Diffusers or softboxes to avoid harsh shadows and specular highlights.
- Overhead room lights either off or dimmed, so your primary lights dominate.
This dual-45° setup is widely recommended in medical and aesthetic photography because it eliminates deep shadows while preserving natural contour.
Photographing darker skin tones
Direct flash or very small light sources can create glare on darker skin tones, blowing out detail and washing away colour variation.
To avoid that:
- Use larger, diffused light sources (softboxes, umbrellas, or diffusion panels).
- Position them at 45° angles rather than straight-on.
- If you must use the phone flash, bounce it off a wall or ceiling instead of pointing it directly at the patient.
In more advanced setups, cross-polarised light (a polariser on both light and lens) helps strip surface reflections and reveal deeper structures, which is useful for subtle pigment and vascular changes.
Step 3: Get your smartphone camera settings under control
Modern smartphones can produce professional-looking clinical photos if you control how you use them.
Use the right lens and distance
The "selfie effect" (big nose, small ears, rounded face) is wide-angle distortion. It is the enemy of honest before-and-after photography.
To avoid it:
- Use portrait mode or the 2x lens (around 50–60mm equivalent) for faces.
- Stand around 1 to 1.5 metres from the patient for facial work.
- Check your framing: both ears should be visible in frontal views. If not, you are too close or too wide.
For close-ups of lesions or wounds:
- Step back and use moderate zoom rather than putting the lens inches from the skin. This keeps perspective natural.
- Use your floor markings so distance is reproducible from visit to visit.
Turn off "beauty" filters
Many default camera apps and social apps quietly apply skin-smoothing "beauty" filters, HDR or contrast-boosting modes, and aggressive noise reduction.
For clinical photos, all of these are harmful. They hide texture and can create misleading impressions of smoothness or roughness.
Best practice:
- Use the native camera app in a neutral, non-processed mode.
- Disable beautification, portrait-retouching, and face-smoothing options.
- Avoid third-party "camera beautifier" apps entirely for clinical work.
Lock exposure and focus
If your camera keeps re-metering and refocusing between shots, skin tone and brightness will jump around even if lighting and positioning are identical.
Most smartphones let you:
- Tap and hold to lock focus and exposure on the face or treatment area.
- Then recompose slightly while keeping those settings locked.
This keeps both before and after at the same brightness, which matters when you are trying to assess subtle redness, pigment, or contour changes.
Clean the lens
Smudged lenses soften detail and reduce contrast, one of the most common problems in day-to-day smartphone photography.
Get into the habit of:
- Wiping the camera lens with a clean, lint-free cloth before each session.
- Avoiding touching the lens with your fingers between patients.
It is a small thing, but you will see the difference immediately in sharpness.
Step 4: Prepare the patient and keep the frame clean
What the patient is wearing and how they are prepared matters as much as where you put the lights.
Set preparation standards
For facial and upper-body photos, consider standardising:
- No makeup on the treatment area, especially for skin conditions and resurfacing work.
- Hair pulled back the same way each time (a low ponytail or disposable cap).
- Neutral drape or gown over clothing to avoid pattern and colour distractions.
- Removal of jewellery, glasses, scarves, and accessories that change the visual frame.
For body and wound photos:
- Use gowns or shorts that consistently expose the same area.
- Remove or move bandages and dressings only as clinically appropriate and safe.
Document these prep rules once and train your team, especially if non-clinical staff help with photography.
Fill the frame with what matters
Professional clinical photos are framed with intent:
- For face work, the head and neck fill most of the frame. You should not see half the exam room or the clinician's feet.
- For lesions and wounds, the region of interest fills the frame with a small margin, and zoomed-out "context" images are taken separately.
Avoid cropping at joints (mid-neck, mid-arm, mid-chin) when possible. Frame to include natural landmarks (jawline, shoulder line, elbow, wrist) so you can later orient yourself and compare accurately.
Step 5: Positioning and standard views
Once your environment is fixed, the next step is deciding which views you will always take and how you will position the patient for each.
Faces: use the Frankfort Horizontal Plane
In facial and aesthetic work, positioning standards rely on the Frankfort Horizontal Plane: an imaginary line between the tragus (ear canal) and the infraorbital rim that should be parallel to the floor. These standards are especially rigorous in plastic surgery before-and-after documentation, where the full five-view series (frontal, obliques, and true profiles) forms the baseline for every case review.
For consistent facial views:
- Ask the patient to look at a fixed point at eye level. A small dot on the wall behind the camera works well.
- Make sure shoulders are relaxed and level, not rotated.
- Confirm the head is not tilted up or down by visually checking that the Frankfort plane is parallel to the floor.
Standard facial views typically include:
- Frontal (looking straight at the camera).
- Left and right 45° oblique.
- Left and right true profile (90°).
- Additional views (e.g. base view for rhinoplasty) when relevant.
Using the same set of views every time is what lets you compare subtle contour, volume, and symmetry changes honestly. For aesthetic injectables specifically, our Botox and filler photography guide covers which animation states to add to this base set.
Skin and dermatology: overview, mid, close-up
Dermatology and aesthetic medicine photo workflows benefit from a three-shot lesion or region protocol:
- Overview: shows anatomical location with clear landmarks (e.g. the entire limb with elbow and wrist visible).
- Medium: shows the full affected area plus a rim of healthy skin.
- Close-up: shows fine detail, ideally with the lens perpendicular to the skin surface.
For total skin or complex cases, standard pose sets (such as full-body sequences) dramatically improve longitudinal tracking, even if you only implement a simplified version.
Wound care: overview + close-up with scale
Wound care progress tracking has its own positioning requirements. Wound, Ostomy and Continence Nurses Society (WOCN) guidelines emphasise:
- One overview image from about one metre, showing where the wound is on the body.
- One or more close-ups at a standard distance, including a measurement scale (a disposable ruler) aligned to the wound.
The only variable between sessions should be the wound. Camera distance, angle, and scale should stay the same.
Step 6: Control expression and timing
For face-heavy specialties (aesthetics, dermatology, plastic surgery), expression and muscle activation are major variables.
Match expressions, do not improvise
A patient photographed smiling in the "before" and serious in the "after" will look worse, even if they clinically improved. The opposite also happens: a better pose and expression in the after photo can make a mediocre clinical result look impressive.
To prevent this:
- Decide ahead of time which expressions or movements you will capture for each indication (for example, rest + maximum frown + eyebrows raised for glabellar toxin; rest + natural smile for lip filler).
- Use the same verbal script every time so the patient makes roughly the same expression on each visit.
For many treatments it is useful to capture three states:
- At rest.
- Natural smile.
- Maximum animation (frown, brow raise, clench, exaggerated smile).
A short, standardised video clip of facial animation or range of motion is also powerful for orthopaedic progress documentation, where tracking range-of-motion milestones is as important as tracking appearance.
Keep timing consistent
In aesthetics and dermatology, the timing of the "after" photos matters. Too early, and swelling or redness can dominate. Too late, and some of the early dramatic change is gone.
Consider:
- Setting standard follow-up windows for photography (e.g. 2 weeks post-toxin, 4 to 6 weeks post-filler, specific weeks for wound or rash follow-up).
- Documenting the time since treatment in the record so you can interpret change correctly.
Step 7: Build a workflow your whole team can follow
Professional before-and-after photos are not the result of one "creative" staff member. They are the result of a simple protocol that any trained team member can execute.
Document a simple checklist
For each major use case in your clinic (acne follow-up, lip filler, wound review), define a one-page protocol:
- Where: which photography spot.
- Prep: makeup off, hair back, gown on, etc.
- Views: which angles and expressions in which order.
- Lighting: which lights on or off.
- Camera: which lens, which distance markers.
This turns "take some photos" into "run the protocol", which is far more reliable.
Capture in a sequence, then review
Stopping after every shot to check the screen breaks the patient's position and expression, and doubles or triples the time it takes.
A better pattern is:
- Capture the full view set in sequence (frontal, obliques, profiles, animation states).
- Then review the strip of images and quickly retake any that are obviously off.
PixioDoc's multi-capture camera was built around exactly this pattern: take a full series without leaving the camera interface, see thumbnails in a strip, drop any misfires, and save everything directly into the right patient and visit. In practice, clinics using this kind of workflow cut photo time by roughly half while improving consistency.
Match the baseline with ghost overlays
At follow-up visits, your goal is not to take a new "nice" photo. It is to recreate the baseline as closely as possible.
Three tools help you do that:
- Floor markers for patient and camera positions.
- Reference images printed or displayed at the photo station.
- Ghost-image overlays, where a semi-transparent version of the baseline photo appears on the camera screen and you align the new shot against it.
PixioDoc includes adjustable ghost overlays so you can pick any previous photo for that patient and match head position, angle, and framing in real time, without expensive hardware. This is especially valuable for subtle facial work where a few degrees of head tilt can change the apparent result.
Step 8: Store and share photos like clinical data, not selfies
Even the most professional before-and-after photos lose their value if they disappear into camera rolls, get compressed and stripped of metadata by messaging apps, or sit in personal cloud accounts.
Avoid personal camera rolls and consumer apps
Regulators and professional bodies treat identifiable patient photos as special category data (GDPR) — or protected health information (HIPAA) in the US — even in private aesthetic contexts. Storing them on:
- Personal camera rolls synced to iCloud or Google Photos.
- Personal Google Drive or Dropbox.
- WhatsApp, iMessage, or other consumer messengers.
creates both compliance risk and operational risk. Photos get mixed with personal content, lost, duplicated, misfiled, and accidentally de-identified. We unpack the legal and clinical exposure in our companion piece on why you shouldn't use your personal phone for patient photos, and on why Google Drive and iCloud aren't a safe home for patient photos under GDPR.
Use a dedicated clinical photo system
Purpose-built clinical photography apps solve three problems at once:
- Capture: photos stay out of the personal camera roll and are linked directly to a patient and visit.
- Organisation: images are stored in patient timelines so you can scroll through the visual story of a case.
- Compliance: encrypted, access-controlled storage with audit logs and the right agreements under GDPR. Our guide on what makes a medical photography app GDPR compliant breaks down the exact features to look for.
PixioDoc was designed around this pattern: photos and videos go straight into a patient-specific timeline, never touch your personal gallery, are stored in EU-hosted, encrypted infrastructure, and every access and share is audit-logged. For aesthetic and dermatology teams, Free includes the interactive progress slider; Pro adds side-by-side and advanced multi-image layouts plus ghost overlays on top of that clinical backbone, so the same system handles both the photography and the in-room comparison. Once you have captured and compared in the room, a patient progress report makes a natural post-consult handoff — a PDF with aligned before-and-afters and treatment notes the patient can review after they leave.
Common mistakes that make photos look unprofessional
A quick checklist of problems you can fix immediately:
- Different background each time. Before on a white wall, after in a busy treatment room. Use one neutral background only.
- Mixed or changing lighting. Window one day, overhead fluorescent the next. Pick a controllable light setup and stick to it.
- Wide-angle distortion. Phone lens too close to the face. Switch to portrait or 2x and stand further back.
- Inconsistent expressions and poses. Smiling before, serious after (or vice versa). Script your expressions and use the same sequence every time.
- No scale for wounds or localised changes. Close-ups with no ruler or context. Add a disposable scale and an overview shot.
- Lens smudges and blur. Clean the lens and use a stable stance or tripod. Blurry photos immediately look unprofessional.
- Photos sitting in the camera roll. Anything that lives in your camera roll is easy to misplace and hard to audit. Capture directly into a clinical app instead.
Frequently asked questions
Do I really need special lights, or can I just use daylight?
Natural window light can look beautiful, but it changes constantly with time of day and weather, which makes comparisons unreliable. For professional, repeatable before-and-after photos, a simple two-light artificial setup at 45° angles with daylight-balanced LEDs is more dependable, and you can still make it look natural.
Is a DSLR better than a smartphone for clinical photos?
A DSLR gives you more control, but multiple studies and clinical photography guides agree that standardisation matters more than camera body. A modern smartphone, used with a consistent lens, distance, and lighting, will produce professional, clinically useful images. If you already own a DSLR and can integrate it into your workflow, great; you do not need one to meet a high standard.
What smartphone settings should I use for medical photos?
Use the native camera app in its standard photo mode. Switch to the 2x lens or portrait mode (50 to 60mm equivalent) for faces. Turn off all "beauty", smoothing, and HDR effects. Tap and hold to lock focus and exposure on the treatment area, then recompose. Clean the lens before each session. Most importantly, use the same settings every visit.
How far should I stand from the patient?
For facial photography, stand at least 1 to 1.5 metres away and use the 2x lens to avoid wide-angle distortion. For wound and lesion close-ups, step back slightly and use moderate zoom rather than putting the lens inches from the skin. Mark the floor with tape so the camera and patient end up in the same spots every visit.
How often should I take before-and-after photos?
It depends on the specialty and treatment:
- Aesthetic treatments: baseline, main follow-up (e.g. 2 to 4 weeks), and key milestones.
- Wound care: baseline, at each dressing change or weekly, and at discharge, following WOCN guidelines.
- Dermatology: baseline and at clinically meaningful intervals (e.g. every 4 to 8 weeks for chronic conditions).
The key is consistency: whatever schedule you choose, apply it systematically so your timelines tell a coherent story.
Can I reuse my clinical photos for marketing?
Only with separate, explicit, written consent that covers marketing use (website, social media, ads) and explains where and how images will be used. Clinical documentation consent on its own does not cover publication. Best practice is to keep marketing consent forms alongside the patient record and honour withdrawal requests quickly.
Where should I actually store these photos?
Not in your personal camera roll, iCloud, Google Photos, WhatsApp, or personal Dropbox. Use a purpose-built clinical photo app that captures directly into a patient timeline and stores images in encrypted, audit-logged infrastructure aligned to GDPR (EU and UK). PixioDoc does exactly that in one mobile-first workflow.
Bringing it all together
Professional before-and-after photos are not a mystery. They are the natural result of a simple, repeatable system: one photo spot, controlled lighting, neutral background, consistent distance and angles, matched expressions, and a capture workflow your whole team can follow.
Layer a purpose-built tool like PixioDoc on top of that system and you solve the second half of the problem: keeping clinical and aesthetic photos out of personal galleries, organising them into patient timelines, matching baselines with ghost overlays, and showing results with an interactive progress slider, all inside an encrypted, audit-logged workspace aligned to GDPR (EU and UK).
The next time a patient asks, "Has it really changed that much?", you will have professional, honest images that let them see the answer for themselves.
Try PixioDoc free for up to 10 patients, no credit card required. Capture and organize on Free; upgrade to Pro to compare visits side by side and share cases securely — without ever touching your personal gallery. Download PixioDoc
Keep patient photos out of your camera roll
PixioDoc gives you a dedicated workspace to capture, compare, and share patient photos — organized by patient timeline, never mixed with your personal gallery.
EU-hostedEncrypted in transit & at rest
Keep reading

Medical Photography Best Practices: Consistent Positioning for Accurate Progress Tracking
Learn the clinical photography standards used by dermatologists, plastic surgeons, aesthetic practitioners, and wound care specialists to capture consistent, comparable before-and-after images that improve patient outcomes and protect your practice.
Read article
Best Medical Photo Apps for Dermatologists (2026 Buyer's Guide)
Compare the best medical photo apps for dermatologists — standalone mobile tools vs PM platforms vs EMR modules. Pricing, free tiers, comparison features, and who each fits.
Read article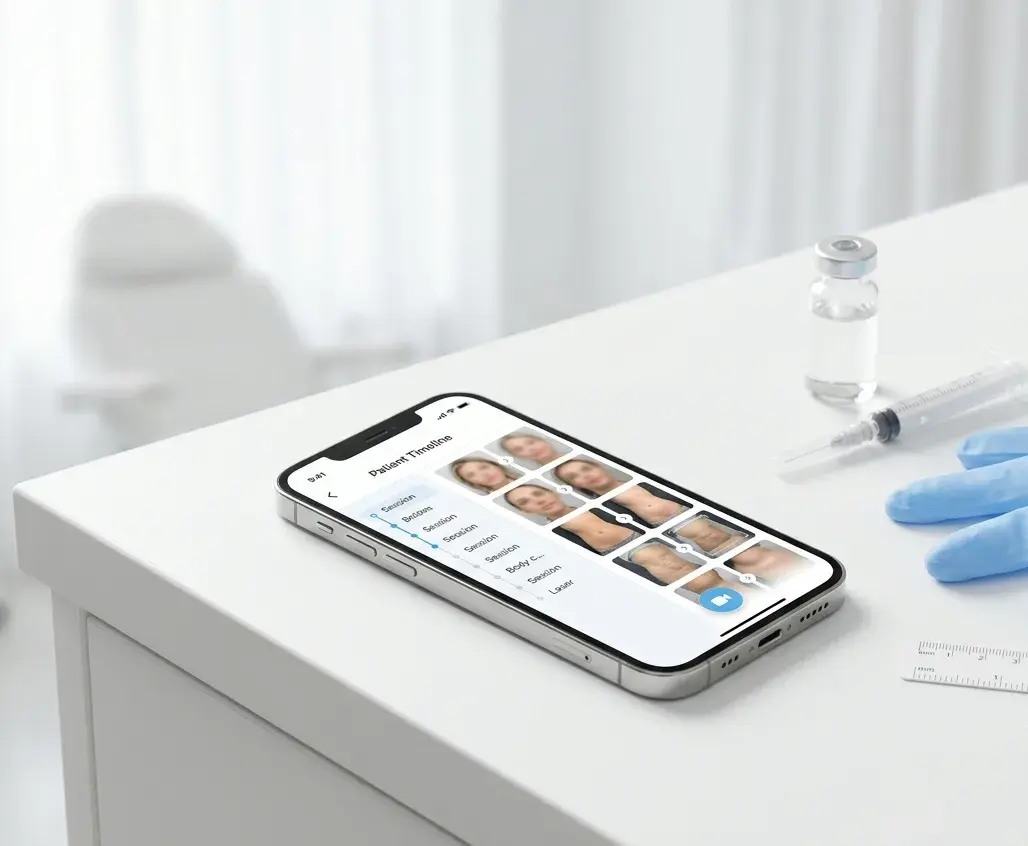
Medspa Photo App: Document Botox, Body, and Laser Treatments in One Workflow
How medspas document injectables, body contouring, laser, and peel results in one patient timeline — and what to look for in a medspa photo app.
Read article