Medspa Photo App: Document Botox, Body, and Laser Treatments in One Workflow
Why Medspas Need a Dedicated Photo App
Your front desk books a body-contouring package. The injector captures a strong baseline. Six weeks later the patient says they see no change — and you cannot prove otherwise, because the follow-up photo was taken in a different room, at a different angle, stored somewhere in a personal camera roll between holiday pictures.
That failure is not clinical. It is documentary. In aesthetic medicine the photo record is the product: it closes consultations, supports the next treatment conversation, keeps multi-session plans on track, and gives patients the visual proof they need to rebook.
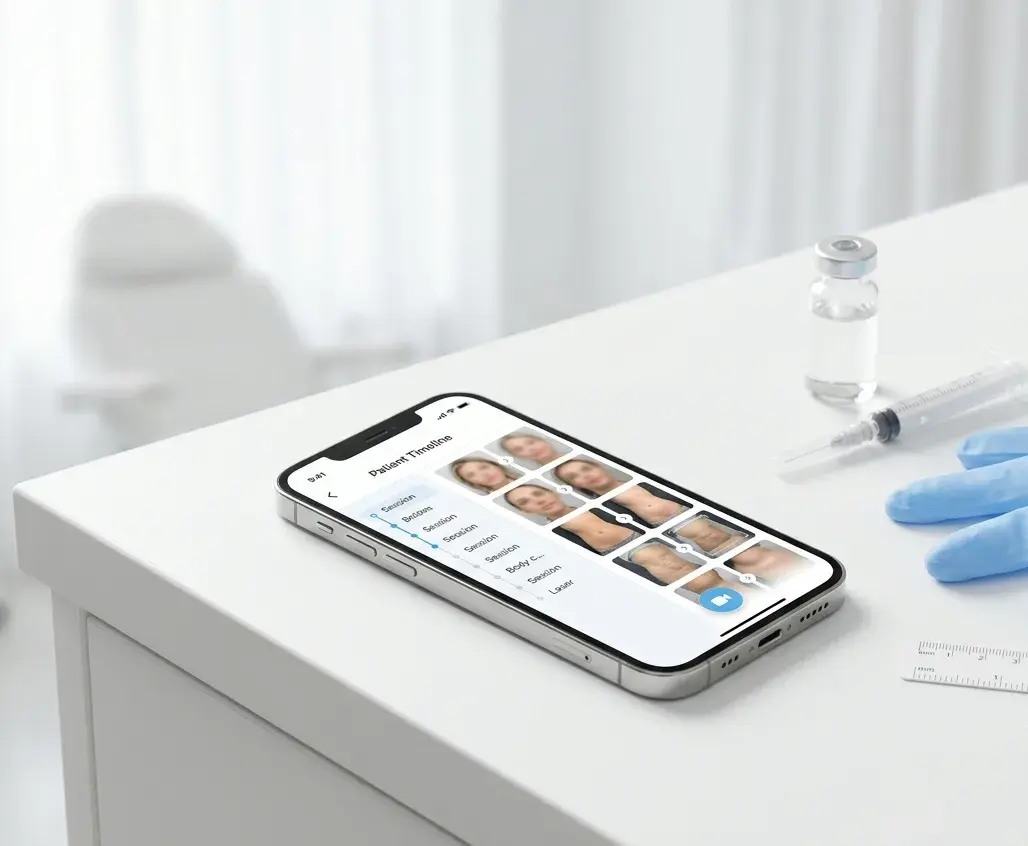
A medspa photo app is a clinical mobile tool that captures before-and-after photos during treatment visits, organises them in a patient timeline, and enables side-by-side comparison in consults — separate from personal camera rolls and consumer cloud folders.
This guide is for aesthetic nurses, injectors, medspa owners, and clinic managers who run more than injectables alone — body contouring, cellulite, laser, microneedling, and peel patients all need the same disciplined documentation workflow.
How to Document Aesthetic Treatments in One Workflow
Document every aesthetic treatment in one patient before/after photo app: create a patient record at first contact, open a session at each visit, capture with ghost overlay or fixed stance markers, compare baseline to current in the chair, and share via encrypted access controls. One timeline per patient covers injectables, body contouring, laser, microneedling, and peels — without separate folders per treatment type.
Why Personal Phones and Shared Folders Break Medspa Documentation
Most medspas start with good intentions and the wrong storage layer.
Patient photos on a personal phone sit next to family pictures and auto-sync to personal iCloud or Google Photos. Research in JAMA Dermatology (2024) found that 85% of dermatologists store over 100 patient images on personal smartphones — often without adequate security. Co-injectors share cases over WhatsApp; a study in BMC Medical Education found 43% of physicians use WhatsApp for professional communication, including clinical content. Someone creates a Google Drive folder named by patient. All three patterns feel fast until you need a baseline mid-consultation, until a new injector cannot find session three of a laser course, or until a privacy audit asks where patient data actually lives.
Three problems repeat across every treatment type:
- No patient timeline. Photos named by date have no reliable link to the patient or visit. By the second follow-up, nobody trusts the comparison.
- No repeatable framing. Body and face treatments both fail when angle, distance, and lighting drift between sessions. A different room makes real progress invisible.
- No secure sharing. Screenshots and consumer messaging apps have no audit trail and no controlled access — we covered the full case in sharing medical photos between professionals.
The secure documentation pattern is straightforward: capture in a dedicated clinical app, store in encrypted EU-hosted storage with access controls, and share through permissions that can be revoked. This is workflow guidance, not legal advice. If you are still on a personal phone, read why you shouldn't use your personal phone for patient photos before you scale.
What to Document by Treatment Type
Different aesthetic treatments change at different speeds and in different places. Your view sets should match the anatomy — but the storage workflow stays the same: one patient record, one timeline, one session per visit.
| Treatment | What to capture | Typical visit rhythm | What progress looks like |
|---|---|---|---|
| Botox and neuromodulators | Frontal at rest and at relevant animation (frown, smile, brow raise, clench for masseter) | Baseline, 2-week review, maintenance every 3–4 months | Softened lines in motion; subtle at rest |
| Dermal fillers (lip, cheek, jaw, chin) | Rest and animation views; lateral profiles for lips and jawline; track lip filler progress photos at matched animation states | Baseline, 2-week review after swelling settles, top-ups as needed | Volume and contour change; animation states matter |
| Body contouring (cryolipolysis, RF, ultrasound fat reduction) | Frontal and lateral of treatment zone; consistent underwear or positioning garment | Baseline, 6–12 week review, sometimes second cycle | Inch loss and contour change; slow and cumulative |
| Cellulite treatments | Same zone at standing rest; mark floor position for hip angle | Per manufacturer protocol, often 4–8 sessions | Texture smoothing over weeks; lighting must stay fixed |
| Laser and IPL (hair removal, resurfacing, pigment) | Treatment area at rest; for face, standard facial views | Per session in a course; compare session 1 to session N | Progressive clearing or resurfacing; cumulative across sessions |
| Microneedling and RF microneedling | Full face or zone at rest; same distance every visit | Every 4–6 weeks for a course | Texture, pore size, and firmness change gradually |
| Chemical peels | Same facial views; document peel depth in session notes | Single peel or series; compare at peel intervals | Pigment, texture, and glow change session over session |
For injectables, the full photography playbook — lighting, animation states, view sets by treatment area — lives in our dedicated guide to consistent botox and filler before-and-after photos. This post focuses on the cross-treatment workflow and the app layer that holds it together.
Two principles apply everywhere:
- Capture a true baseline before the first treatment, under your standard conditions — not "when there is time."
- Use the same photo station, lighting, and floor markers every visit. The fundamentals are in medical photography best practices and our professional before-and-after photography guide.
The Consult-to-Rebooking Workflow
Clinics that document well do not treat photography as an afterthought. They run the same five steps every patient, every treatment type.
1. Create the patient record at first contact
Add the patient before the first photo. Every subsequent image lands on the same timeline — injectables, laser session four, cellulite session six. Optional patient tags (for example "body contouring" or "lip filler") keep long patient lists filterable as the clinic grows.
2. Open a session at each visit
A session is the set of media captured during one appointment. Naming visits as sessions — not loose folders or camera-roll albums — is what makes multi-treatment patients navigable six months later.
Session drafts matter in a busy clinic: if a patient needs a break mid-capture, save the session and resume from the dashboard or patient timeline without losing partial work.
3. Capture with angle matching
For face treatments, ghost overlay — a semi-transparent previous photo on the live viewfinder — aligns the new shot to the baseline in real time. For body zones, mark the floor for patient stance and camera distance; use the same background and lighting every time.
Annotate areas of clinical interest or blur identifying features on the image before saving when needed. Both happen before the photo enters the patient record.
4. Compare during the consultation — before you ask how they feel
Open the timeline. Show the baseline alone, then the side-by-side comparison or progress slider (Pro plan). Let the patient see the change before they judge it from memory.
Patients routinely miss gradual results — toxin settling over two weeks, filler after swelling, body contouring at week eight. The psychology and revenue impact of that gap are covered in the before photo problem. The documentary fix is the same: show the comparison first, then discuss next steps.
5. Share securely when another provider needs the record
Multi-injector clinics and locum cover need the full visual history without WhatsApp screenshots. Share the patient record at the access level you choose; revoke when the collaboration ends.
What to Look for in a Medspa Photo App
Not every "before and after" tool is built for daily clinical use. Use this checklist when you evaluate options — including dedicated apps and all-in-one practice platforms.
| Requirement | Why it matters for medspas |
|---|---|
| Patient timeline by visit | Injectables, laser courses, and body packages span months; you need session-level organisation |
| Side-by-side comparison in consult | Progress must be visible to the patient in the chair, not exported later (Pro on PixioDoc) |
| Ghost overlay or alignment guides | Consistent angles across visits; critical for subtle injectable and peel results |
| Capture without personal camera roll | Patient photos must not mix with personal galleries or personal cloud sync |
| Annotation and privacy blur before save | Mark treatment zones; blur identifiers before storage |
| Secure sharing with audit trail | Co-injectors and cover staff need access without consumer messaging apps |
| EU-hosted, encrypted storage | Security-first by design — encrypted in transit and at rest, with access controls |
| Self-serve start | Solo injectors and small medspas should not need a sales demo to try the workflow |
Avoid tools that lead with vague "compliance" badges without specifics. Ask where data is hosted, how access is logged, and whether you can sign a data processing agreement. Our buyer-focused breakdown is in what makes a medical photography app GDPR compliant.
Medspa photo app vs personal phone vs enterprise platforms
| Approach | Patient timeline | In-consult comparison | Self-serve start | Typical pricing model |
|---|---|---|---|---|
| Personal phone / cloud folder | No | Manual export | N/A | Free (hidden compliance and time cost) |
| Enterprise aesthetic platforms (e.g. RxPhoto) | Yes | Yes | Demo-led | Practice-level subscription |
| Dedicated apps (e.g. PixioDoc) | Yes | Yes (Pro) | Yes | Per-clinician subscription |
PixioDoc is built around this workflow: patient timelines, ghost overlay capture, one-swipe before-and-after comparison on Pro, annotation and privacy blur, patient tags, session drafts, and encrypted EU-hosted storage.
For aesthetic-specific positioning, see our aesthetic medicine page. Comparing dedicated photo tools? See PixioDoc vs RxPhoto and PixioDoc vs PhotoDoc for pricing and workflow differences.
Common Mistakes Across Treatment Types
Documenting injectables like body treatments (or the reverse). Toxin needs animation states; body contouring needs fixed stance and zone framing. Use the right view set per treatment — do not default to "a few frontals."
Skipping mid-course photos on laser and peel series. Session one to session four is where patients decide whether to finish the package. Capture every session identically.
Letting each injector store photos privately. When cover staff cannot see the baseline, the consult resets to zero. One clinic timeline per patient.
Treating the comparison as a defence instead of a ritual. Show before-and-after at every follow-up before asking for feedback — not only when the patient expresses doubt.
Reusing treatment documentation for marketing without separate consent. Documentation consent and Instagram consent are different agreements. Keep them separate and written.
Frequently Asked Questions
What is a medspa photo app?
A medspa photo app is a clinical mobile app for capturing, organising, and comparing patient before-and-after photos during aesthetic visits. It stores images in a session-based patient timeline, keeps photos out of personal galleries, and supports in-chair side-by-side comparison for injectables, body contouring, laser, microneedling, and peels.
Do I need a separate app for botox photos and body contouring photos?
No. One patient should have one timeline across all treatments. A lip filler baseline and a later body-contouring series belong on the same record if it is the same patient. What changes per treatment is the view set and capture protocol — not the storage system.
How often should I photograph body contouring and cellulite patients?
Follow your device or product protocol, but always capture at baseline, at the manufacturer-recommended review interval (often 6–12 weeks for body contouring), and at any point you discuss a second cycle or top-up. Cellulite courses often run 4–8 sessions; photograph every session under identical lighting and stance.
Can I use the same medspa photo app for laser, microneedling, and chemical peels?
Yes. All three are multi-session skin treatments that benefit from the same workflow: baseline session, identical framing at each visit, timeline comparison across the course. Laser hair removal compares clearing session over session; microneedling and peels compare texture and pigment change.
What is the best medspa photo app for a small clinic?
Look for self-serve signup, a free tier to test real patients, patient-based pricing (not photo-count caps), ghost overlay or alignment tools, in-consult comparison, and encrypted storage with a clear data-processing agreement. PixioDoc offers a free plan for up to 10 patients and Pro at €6.99/month with unlimited patients — see PixioDoc vs RxPhoto for how that compares to enterprise aesthetic photography tools.
Are aesthetic before-and-after photos protected health data?
Educational overview only — confirm requirements with your counsel. Photos that show identifiable patient features are sensitive personal data. Under GDPR they are typically special category data when they relate to health or treatment. In the US, similar photos are generally treated as protected health information. They require appropriate security, access controls, and lawful basis for processing — not storage in personal galleries or consumer cloud accounts.
Ready to document every aesthetic treatment in one place? PixioDoc gives medspas a patient timeline per visit, ghost-overlay capture, one-swipe before-and-after comparison on Pro, annotation and privacy blur, and encrypted EU-hosted storage. Start free with up to 10 patients — no demo call required. Download PixioDoc or see the aesthetic medicine workflow.
Keep patient photos out of your camera roll
PixioDoc gives you a dedicated workspace to capture, compare, and share patient photos — organized by patient timeline, never mixed with your personal gallery.
EU-hostedEncrypted in transit & at rest
Keep reading

The Before Photo Problem: Why Patients Don't See Their Own Results
The toxin settled exactly as planned, the filler is balanced — and the patient says it did nothing. Why patients are wired to miss gradual results, what that costs aesthetic clinics in rebookings, and the before-photo ritual that fixes it.
Read article
How to Take Consistent Before-and-After Photos for Botox and Filler
A practical photography workflow for aesthetic injectors — repeatable lighting, the right view set for toxin and filler, animation states that actually compare, and the storage rules medspas keep getting wrong.
Read article
How to Take Professional Before-and-After Photos in Your Clinic
A camera-agnostic playbook for clinicians and medspas: lighting, framing, distance, and a smartphone workflow for before-and-after photos that look professional.
Read article